Kubernetes CTO Primer
8 min. read
8 min. read

If you are a CTO or IT manager, you have likely heard about containerization and orchestration of applications. Perhaps you are ready to re-architect a legacy application, or plan for an upcoming digital transformation of a manual system. This article will provide a high level overview of what application containerization is, and what orchestration with Kubernetes entails.
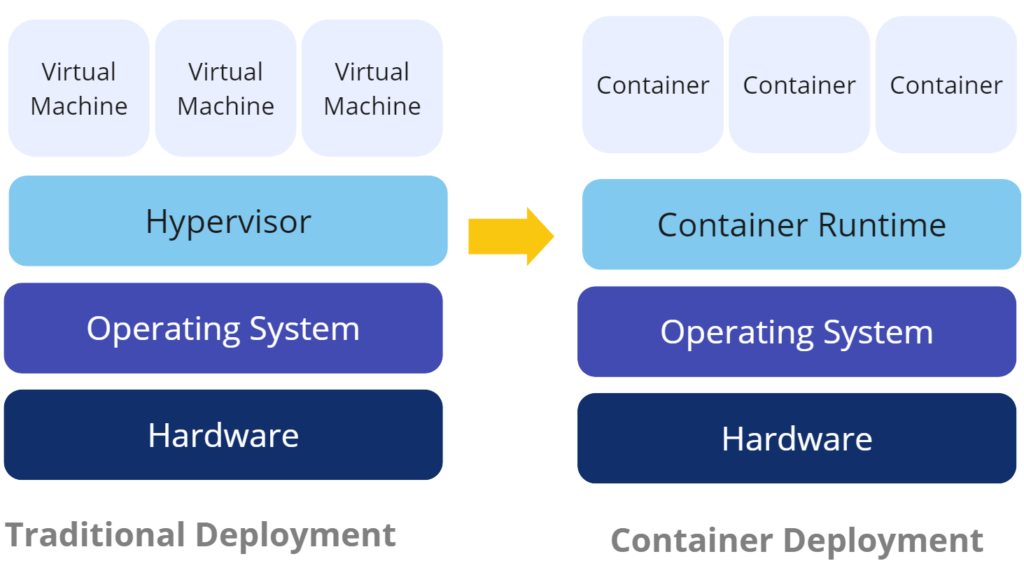
Containerization refers to taking a new or existing application and allowing it to run in a ‘container’, or virtual environment that you define ahead of time, and can run on any infrastructure in the cloud or on-premise. For example, you may have a Python microservice that runs an API. The corresponding container would be configured to use a base container image that has Python installed, then additional configurations would outline which libraries or packages need to be installed when the container is built. Containers are great because you can define the operating system and all of the libraries needed for your application to run once, and no matter where the container actually runs, it will always have the same code, configurations and settings. Containers in themselves are really just archives of the data, which are called layers, that make up the overall container. Containers cannot run without a runner or orchestration system, which is essentially a server to queue up containers, terminate them when needed, or spin up new instances if things get too busy for the workload.
Containers need to be run on a server that is optimized to monitor the health of the container, starting and stopping containers as needed, and scaling them when load to the container changes. This is where orchestration and Kubernetes come in. Kubernetes was first released by Google in 2014, however they had been using it internally for over ten years before that under various internal code-names. Kubernetes is open source, and it is the underlying framework for most of the elastic computing options that AWS, Google, and Microsoft provide. Each provider has their own flavour of Kubernetes, with varying levels of hand-holding available, but realistically the commands and procedures are the same no matter where your cluster is hosted.

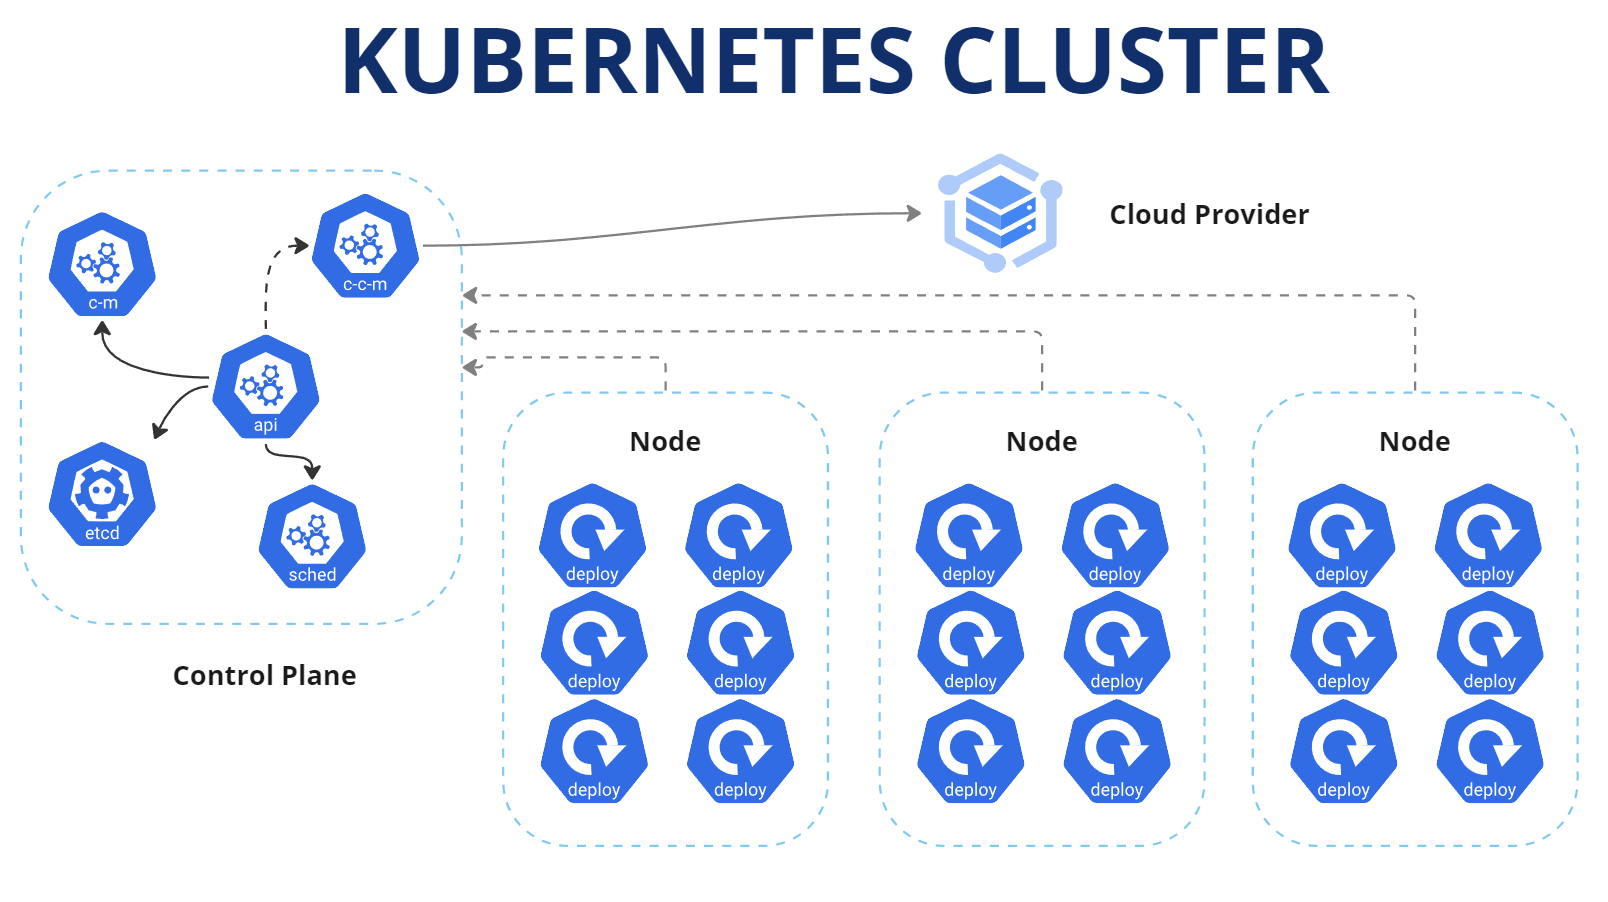
When you create a Kubernetes cluster, at a minimum you need three separate servers to form the cluster. The first server acts as a control plane to schedule the creation and removal of containers, or Pods as they are called in Kubernetes. The other servers in the cluster are used as Nodes that run the various Pods that are configured to run on the cluster. Pods are run within Deployments, which is an entity that outlines what container(s) should run inside of a Pod, how much resources should be allocated, as well as settings associated with storage volumes or environment specific configurations. The Deployment makes a reference to a Service, which is essentially a way for Kubernetes to know how you want the Deployment to be accessed. In the Service declaration, you define things like the network ports to use for incoming traffic, as well as which Deployment to send traffic for the Service. Services can also have Ingresses, which open up public endpoints to the actual Service, if needed.
The beauty of Kubernetes is that all resources that are needed to stand up your platform’s infrastructure are defined in configuration files that define each resource. Kubernetes uses YAML files that outline each resource’s needs. Once these configurations are created, they can be committed to source control, so that changes can be tracked. When changes are needed to the specifications of a resource, the corresponding YAML file is updated, and the new configuration is applied to the cluster, allowing the control plane to schedule the update to the resource(s) affected by the configuration change. Configuration settings that store sensitive information like API keys or database connection strings can be stored in Kubernetes’ built in Secrets manager that allows sensitive data to be securely entered into the cluster by administrators, and referred to in resource declarations, without the sensitive information being shown in configuration files. Having configurations and settings stored in configuration files allow teams to easily create multiple environments for DEV, UAT and Production clusters, changing out only the necessary configurations for each environment.
If you are used to deploying applications on traditional web server infrastructure, this next section outlines some of the key differences when deploying applications to Kubernetes.

Pods that run in Kubernetes should be considered ephemeral, or short-lived and this applies to the data that is created on the pod when it runs. This is a very important point because it means that if your application creates files, or perhaps your end-users upload files, if you store the files on the running Pod they will be lost by default, unless you specify a Persisted Volume. Persisted Volumes are implemented in different ways by each cloud provider, meaning AWS uses their own S3 bucket storage to back their implementation of Persisted Volumes, while Google uses their own cloud storage implementation. The key here is that regardless of the backing storage, the declaration of the volume is the same, allowing for standardization and avoiding vendor lock. Ideally, new apps that are developed should never rely on local storage, but rather use microservices that connect directly to cloud based storage. That said, Persisted Volumes are a great way to get older legacy applications that still use local storage to be able to be run in Kubernetes.
Managing an application that is deployed in Kubernetes is much different than applications that are deployed on traditional web-server environments. With traditional web-server hosting when you need to update your app, it typically entails a process that includes bundling your app files, transferring the files, copying them to a particular directory, then restarting your web-service. With Kubernetes based systems, an update to a microservice typically revolves around a new container for a Pod being created, and the control plane being notified that a new version is ready. From there, the control plane will schedule a pull, or download, of the new container and schedule the deployment responsible for the container to roll it out once pulled. The benefit here is that the control plane will always keep the service being updated online, meaning the previous version will stay alive, until the control plane is absolutely sure the new version of the container is up and running properly. From there, the control plane will schedule the termination of the older container, and begin to send traffic to the new container. In addition to the benefit of having no service interruptions, another key benefit is that deployments can become automated through the use of deployment pipelines, which look for changes to code and automatically deploy them to the testing environment, and eventually to production.
Assuming you are using a cloud provider like AWS, Google Cloud, or Microsoft Azure’s standard Kubernetes offering, and not a fully managed Kubernetes solution like AWS’ Fargate or Google Cloud Run, hosting a Kubernetes cluster will cost a marginal preset fee per month for each cluster, plus the costs for whatever CPU, RAM and storage resources you use in your cluster. If you only need a couple small nodes to run your workloads, you only pay for the CPU / Memory that you have allocated for each node, which typically tie right back to each cloud provider’s virtual machine (VM) pricing. For example, if your cluster has 3 virtual machines using AWS’ t3-medium template, you will be charged for the CPUs and RAM associated with that tier, as well as the per month (EKS) cluster fee of ~$60. On small platforms, this additional cost can be noticeable, however on any medium to large platform it’s barely noticeable. In fact, when compared to traditional VM hosting, organizations will often need to overprovision resources, so with that in mind, oftentimes migration to Kubernetes can result in cost savings.
There definitely is an associated learning curve with learning how to administer and maintain Kubernetes clusters, nodes, and workloads. If your team typically deploys updates through GUI based FTP programs and not through command line terminals, it may be a bit of a challenge to work with Kubernetes’ default configuration tool, KubeCtl. That being said, we have found that within a couple weeks of use, most teams are able to adapt to use KubeCtl, and oftentimes manual interaction with clusters can be minimized by developing deployment pipelines that automatically deploy services, once approved by stakeholders.
This article was meant to be a high-level overview of what is involved in containerization and how Kubernetes is used for the orchestration of application containers. Since not all applications need Kubernetes or orchestration, it is important to decide early if it is worth running an application in Kubernetes or if an alternative hosting environment should be used. If your organization has specific questions relating to migrating a new or existing application to containers and Kubernetes, please feel free to contact Wired Solutions today.